IR-controlled A/C (4/many) - The UI
One very important realization, pretty early in my geek life, was that I’m not a designer. And by that I mean that most websites I have (tried to) designed have ended up being very … let’s just say no great, and that it usually takes me a large amount of time to get to that result.
The graphical design
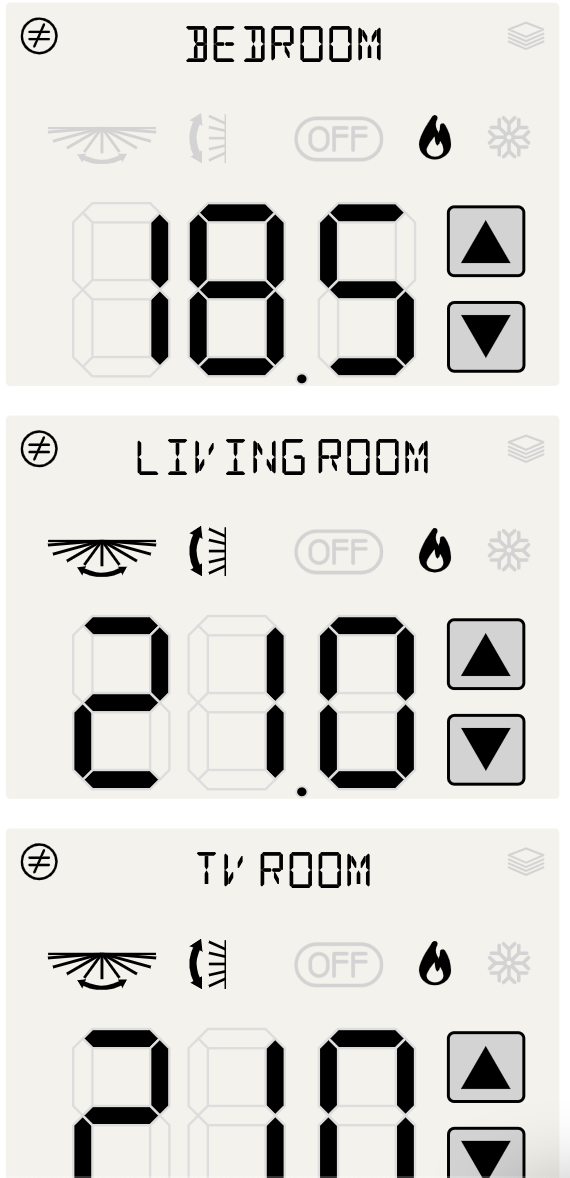
Well, I’m trying to replace IR remotes, so I tried to make it look a little bit like a remote control. I just wanted to combine the several rooms into one view.
I found a decent font that looks like 7 segment, which was fine to display the room names, and for the temperature itself, I went with an 7-segment SVG, and I can easily switch any part from Javascript. I just define a map with the state of each segment for each number between 0 and 10.
class SevenSegmentDisplay {
  el = undefined;
  mapping = [
    [1, 1, 1, 1, 1, 1, 0],
    [0, 1, 1, 0, 0, 0, 0],
    [1, 1, 0, 1, 1, 0, 1],
    [1, 1, 1, 1, 0, 0, 1],
    [0, 1, 1, 0, 0, 1, 1],
    [1, 0, 1, 1, 0, 1, 1],
    [1, 0, 1, 1, 1, 1, 1],
    [1, 1, 1, 0, 0, 0, 0],
    [1, 1, 1, 1, 1, 1, 1],
    [1, 1, 1, 1, 0, 1, 1]
  ];

  constructor() {
    this.el = $(`<svg xmlns="http://www.w3.org/2000/svg" width="192px" height="320px" viewBox="-1 -1 12 20">
            <g id="adefg" style="fill-rule:evenodd; stroke:#DDDDDD; stroke-width:0.25; stroke-opacity:1; stroke-linecap:butt; stroke-linejoin:miter;">
            	<polygon id="a" points=" 1, 1  2, 0  8, 0  9, 1  8, 2  2, 2" fill="#DDDDDD"/>
            	<polygon id="b" points=" 9, 1 10, 2 10, 8  9, 9  8, 8  8, 2" fill="#DDDDDD"/>
            	<polygon id="c" points=" 9, 9 10,10 10,16  9,17  8,16  8,10" fill="#DDDDDD"/>
            	<polygon id="d" points=" 9,17  8,18  2,18  1,17  2,16  8,16" fill="#DDDDDD"/>
            	<polygon id="e" points=" 1,17  0,16  0,10  1, 9  2,10  2,16" fill="#DDDDDD"/>
            	<polygon id="f" points=" 1, 9  0, 8  0, 2  1, 1  2, 2  2, 8" fill="#DDDDDD"/>
            	<polygon id="g" points=" 1, 9  2, 8  8, 8  9, 9  8,10  2,10" fill="#DDDDDD"/>
            </g>
            </svg>`);
  }

  // Getter for the element
  get element() {
    return this.el
  }

  setDigit(number) {
    number = parseInt(number);
    if (number > 9 || number < 0) {
      console.error("Can't display number " + number);
      return;
    }

    let elements = this.el.find("polygon")
    for (let i = 0; i < 7; i++) {
      $(elements[i]).attr("fill",
        (this.mapping[number][i] ? LCDOn : LCDOff));
    }
  }
}
The code design
With the basic functionalities, ie. get the current state, display it, and send updates, there weren’t too many design decisions to be made. A local config file would have the (tunnel) IP address and port of the Pi inside my home acting as a gateway.
The quirks
With 3 rooms and several buttons (off/heat/cool, etc.) I had to add a litle bit of a wait between the time a key is pressed and the time I send the instruction over — otherwise,there’s a risk that a 3 degre adjustment beeps 3 times (well, 6, because it’s all in Celsius and the increment is 0.5°C)).
A timeout was easily added to solve that.
I also had to add some logic around the modes: if some rooms are heating and I set a room to “Cool”, it should stop the rooms that were heating. Again here, fairly easy logic.
I chose to reload fully the data after sending the POST request over, because I’m pretty lazy and it’s a good way to check visually that the new status aligns with the desired status.
I also added a mode for “all room the same”, which hides the several controllers and just shows one. From the start, I actually had in my Go backend a meta-room called “all”, which I forgot to mention. So there’s a toggle between “all room the same” and “to each their own settings”.
The results