The DNS privacy issue
Travelling nowadays I’m generally a lot less worried about (online) privacy and security than I was 10 or years ago, because everything is HTTPS. No snooping, no man in the middle, it’s wonderful.
There is a big exception though, and that’s the DNS requests. A lot of hotels have a portal system asking for your room number and maintain authorization based on MAC addresses, so they could know exactly who is looking for which domain names. This may have privacy implications, and they may even sell that data, who knows.
This is actually true for your local ISP as well, and they definitely sell that data, but that’s another story.
One Solution
One way to prevent this is of course to use a VPN, like Wireguard to one of my servers, or a commercial VPN, but this may slow down my connection quite a bit, potentially change my external IP address’ detected country, and some sites detect VPN and just won’t let it happen. Also, your hotel may just allow ports 80 and 443.
Another way — which I’ll explain here — is to use DNS over HTTPS.
A few things to note:
- You can set this up in Chrome directly, but there are other apps running on my computer, and it’s a bit of a pain to change, and I may not want this to still apply when I’m home (maybe I do, I don’t know anymore)
- You generally still need to start with your Hotel/Hotspot’s DNS server, because it usually has the record for the portal you use to agree to the terms of use
- This won’t work on your phone. If I find the time and patience, I will look into how to do this properly on my travel router that I bring to most places
- Apparently Mac OS 13 has in its code the capability to do DNS over HTTPS, but there is no way to configure it.
Software & desing
So the idea is to have something listen on port 53 of localhost, and once you have passed the captive portal, just change the DNS server in Mac OS settings to be 127.0.0.1.
I wish you could specify another port, but that’s not supported, so 53 it is.
There’s plenty software out there that can help us, the most popular seems to be dnscrypt-proxy. I have played with it in the past and it works ok, but I’m just not a python person (and I have absolutely no good reason for that).
I like Go, and https://github.com/m13253/dns-over-https seems to have it all.
The doc says it doesn’t play well with the python dnscrypt-proxy server, so I’ll
- either have to deploy the doh-server on my server,
- or have it use Googles DNS over HTTP (see https://developers.google.com/speed/public-dns/docs/doh)
I this I could do without the doh-server side, by having doh-client directly talk to Google’s our Cloudflare’s servers.
But let’s assume that for some reason the hotel I’m in blocks requests to 8.8.8.8 and 8.8.8.4 (very unlikely, but just for the purpose of showing the full install here).
+--------------+                        +------------------------+
| Application  |                        |   Google's 8.8.8.4     |
+-------+------+                        +-----------+------------+
        |                                           |
+-------+------+                        +-----------+------------+
|              |                        |      The Internet      |
|    Mac OS    |                        +-----------+------------+
+-------+------+                                    |
        |                               +-----------+------------+
+-------+------+  +------------------+  |       My server        |
|  doh-client  +--+   The Internet   +--+ (Apache -> doh-server) |
+--------------+  +------------------+  +------------------------+
First try
Let’s try things out first:
- launching manually
doh-clienton mac os, as root, in oder to bind on port 53- configuring it to use https://my.server.name/dns-query/ as upstream server
- bootstrapping: well, I’m just leaving Google’s server right now (in order to resolve
my.server.namebut if that IP was blocked indeed, the trick is to put it in/etc/hostsand you can leave thebootstrapfield empty — I haven’t tested this)
- set up the proxy settings on my server
- manually running doh-server on port 5380
- configure it to use 8.8.8.8 in ‘tcp-tls’ mode
Building on the server side
Debian 11 comes with go 1.15, but this requires 1.17 or later (for modules). Go 1.17 can be found in the debian backports, but installing it doesn’t install a diversion, and go still points to 1.15. Just edit the Makefile to force that.
From
ifeq ($(GOROOT),)
GOBUILD = go build
else
GOBUILD = $(GOROOT)/bin/go build
endif
to
GO = /usr/lib/go-1.17/bin/go
ifeq ($(GOROOT),)
GOBUILD = $(GO) build
else
GOBUILD = $(GO) build
endif
Configuring the server
To use Google’s servers
upstream = [
    #"udp:1.1.1.1:53",
    #"udp:1.0.0.1:53",
    "tcp-tls:8.8.8.8:853",
    "tcp-tls:8.8.4.4:853",
]
Configuring Apache
<VirtualHost>
    [...]
    ProxyPass /dns-query http://[::1]:8053/dns-query
    ProxyPassReverse /dns-query http://[::1]:8053/dns-query
</VirtualHost>
And the command line on the server side
$ ./doh-server -conf ./doh-server.conf
And now we try
Now setting my MacOS’ network preference to use 127.0.0.1, and tadah! Everything seems to be working.
% dig @localhost A google.com

; <<>> DiG 9.10.6 <<>> @localhost A google.com
; (2 servers found)
;; global options: +cmd
;; Got answer:
;; ->>HEADER<<- opcode: QUERY, status: NOERROR, id: 11612
;; flags: qr rd ra; QUERY: 1, ANSWER: 1, AUTHORITY: 0, ADDITIONAL: 1

;; OPT PSEUDOSECTION:
; EDNS: version: 0, flags:; udp: 512
; CLIENT-SUBNET: 2603:7000:3240::/56/39
;; QUESTION SECTION:
;google.com.			IN	A

;; ANSWER SECTION:
google.com.		300	IN	A	142.250.80.46

;; Query time: 531 msec
;; SERVER: 127.0.0.1#53(127.0.0.1)
;; WHEN: Sat Nov 26 18:11:50 EST 2022
;; MSG SIZE  rcvd: 80
Running as root
One thing I don’t like: MacOS won’t let you configure a DNS server on a port other than 53.
And I don’t want to run this as root. Why? I would just rather not. I haven’t read the code, even if I had, I’m not a security expert, it just seems that it doesn’t need to.
Potential solutions and workarounds:
- I could just run
doh-clientwhen I’m traveling and using it, as root. That’s better that keeping it running as root all the time - I could run netcat at root :-) and have it redirect to
doh-clientrunning on an unprivileged port
An interesting lead: fiddling around launchd, there is apparently a way to run as a user and still bind to a low port.
Unfortunately, the way this works is that launchd opens the socket for you, and then the listening program has to get it by calling launch_activate_socket which this project does not support.
This project called launch_socket_server however may give a way.
Essentially it will do the “netcat” part I need.
It seems to only accept TCP connections. I mean I could try to change that in the plist file, but I’m not sure it will work.
This looks promising however: https://github.com/x13a/init-proxyd
Buidling the init-proxyd project
Building it on my Mac I get:
package github.com/x13a/init-proxyd
	imports github.com/x13a/init-proxyd/sockets
	imports github.com/x13a/go-launch: build constraints exclude all Go files in /Users/henri/Documents/Dev/go-workspace/pkg/mod/github.com/x13a/go-launch@v0.0.0-20220817124818-5e84cd966569
A bit of Googling brings me to https://github.com/golang/go/issues/24068, which has me look at the CGO_ENABLED environment variable.
CGO_ENABLED=1 make
Woohoo, it works! make install works great.
$ sudo make install
$ sudo launchctl load /Library/LaunchDaemons/me.lucky.init-proxyd.plist
$ ps ax | grep init-proxy
14386   ??  Ss     0:00.05 /usr/local/sbin/init-proxyd -d :5380
The doc says it may not work with nobody/nogroup, so originally I edited the provided sample plist file to run “as me”, which I don’t love either (but is better than root I guess?), but actually nobody/nogroup works fine, and the default example binds on port 53 (localhost, ipv4), both tcp and udp, so make install works out of the box.
Running doh-client as an agent
Now, have the doh client run automatically. Modify the sample plist so that it will run as me, not as root.
<?xml version="1.0" encoding="UTF-8"?>
<!DOCTYPE plist PUBLIC "-//Apple//DTD PLIST 1.0//EN" "http://www.apple.com/DTDs/PropertyList-1.0.dtd">
<plist version="1.0">
	<dict>
		<key>Label</key>
		<string>org.eu.starlab.doh.client</string>
		<key>ProgramArguments</key>
		<array>
			<string>/usr/local/bin/doh-logger</string>
			<string>doh-client</string>
			<string>/usr/local/bin/doh-client</string>
			<string>-conf</string>
			<string>/usr/local/etc/dns-over-https/doh-client.conf</string>
		</array>
		<key>RunAtLoad</key>
		<true/>
		<key>KeepAlive</key>
		<dict>
			<key>SuccessfulExit</key>
			<false/>
		</dict>
		<key>ThrottleInterval</key>
		<integer>5</integer>
	</dict>
</plist>
Installing the server side as a service
Good surprise, on the server side make install works well.
I’m seeing that DynamicUser=True is set, which is good, dog-server will not run as root.
Thing that could be better
- On the Mac OS side, redirecting to a tcp socket isn’t ideal - another process could bind to it before the dns-over-http client does - though honestly in that case it means my computer is compromised already.
- One way would be to implement support for Unix Socket in the client.
- Still, there would still be 2 processes on the Mac OS side. A solution to this is to implement
launch_activate_socket.
Maybe I’ll do that :-)
- The client process currently runs as “me” - I should see if I can have it run as a nobody or the MacOS equivalent
Not running an open server
Well, that one is pretty easy. Instead of configuring everything for /dns-query', configure it for /super-secret/dns-query`.
It’s simple, but if this is just for your own use, it works great.
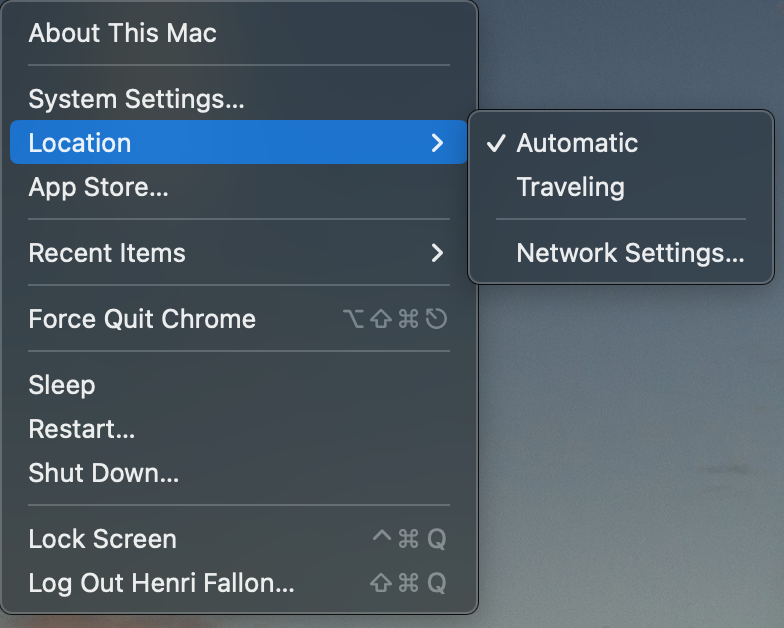
Location, location, location
Mac OS Ventura has removed the “location” UI. While for in 10+ years using MacOS I never found the use for that feature, now that it’s gone, I see it. Locations is the proper way (or at least one way) to switch to the “forced” DNS setting.
To create a new location (in this example called Traveling) just use the following. command line
$ networksetup -createlocation Traveling populate
And just like that, “location” is back in the Apple menu